I often challenge myself to use an item from a stamp set that is NOT the main image. The sentiment here, heat embossed with glittery gold powder, stands solidly on its own without using one of the images. (I have another holiday using a set without the main image here.) This is a great stamp set for those who celebrate Christmas and those that celebrate Winter and the start of a new year. Head over to the website to get yours now! |
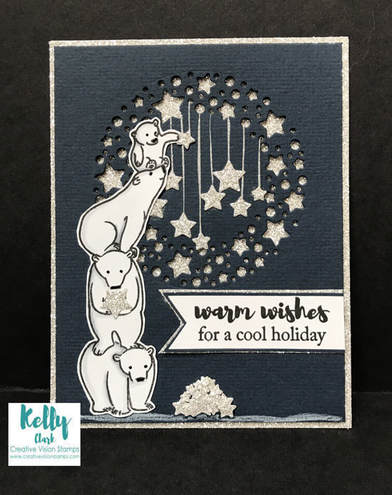
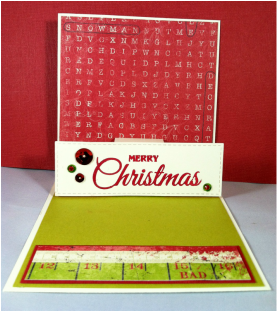
Oh, the shine of this card made using Creative Vision Stamps' "Beary Merry" set! Unfortunately, you can't really tell from the photo. The background is a Foilable that took about 40 seconds to make once the Minc was heated up. I added a layer of gold glittery card stock on top of that and cut a hole to fit the sentiment
0 Comments
As promised, here is another card using the "Beary Merry" set from Creative Visions Stamps. This time, I focused on the trees, rather than the bears.
This card, created with Creative Vision Stamps' "Beary Merry" set, reminds me a bit of a chapter from one of the Mary Poppins books by P. L. Travers. For those of you who've only seen the movie musical, you haven't experienced the real Mary Poppins. She is certainly magical, but she is also self-absorbed and prone to teaching scary lessons to misbehaving children. Nonetheless, I love the magic and have read all the books more than once.
The chapter I reference has to do with putting stars up in the sky. Here's a paragraph from the book: "Then Jane and Michael saw a most amazing sight. As soon as she arrived at the top of her ladder, Mrs. Corry dipped her brush into the glue and began slapping the sticky substance against the sky. And Mary Poppins, when this had been done, took something shiny from her basket and fixed it to the glue. When she took her hand away they saw that she was sticking the Gingerbread Stars to the sky. As each one was placed in position it began to twinkle furiously, sending out rays of sparkling golden light." Whoo-hoo! There are a lot of fantastic new stamp sets at Creative Vision Stamps; it's an incredible new release of stamps and Foilables!
Purple is my favorite color, and it is such a great - and sometimes unexpected - color for winter. I used Creative Vision Stamps' "Create 8" Paisley as a background because the flowers and swirls reminded me of Winter's snow and wind. (I'm originally from Kansas, so I can tell you about wind!) I also used Creative Vision Stamps' "Blessings of the Season" for my image. I went monochromatic but still ended up with a lot of texture because I added lilac glitter and chunky white glitter to add a bigger winter feel.
These Foilables are a great time saver and look like a million bucks with the incredible shine they give off. If you haven't tried foiling before, I recommend the foils at Creative Vision Design - high quality and lots of product! If you like what I created today, you can shop www.creativevisionstamps.com shop use my Design Team discount to receive 10% off your next order of $20 or more. Enter my code: KELLY10 at checkout. (It is valid on regular priced items only, doesn't count toward shipping and taxes, and cannot be used with their custom stamp service.) I swear to you, when I was in 1st grade, I was standing by the bedroom window and saw Rudolph's nose. SANTA IS REAL! While I'm no longer a Christmas girl, the magic of Santa is special no matter what. This image and sentiment are from a clear stamp set, Santa's List, from Creative Vision Stamps. Santa and his accoutrements were colored with Copic markers. There was something missing with the background, so I got out my white gel pen and added a pattern to it. Next time I need to find paper with that background on it, because that took a loooong time to do! If you like what I created today, you can shop www.creativevisionstamps.com and use my Design Team discount code to receive 10% off your next order of $20 or more. Enter my code KELLY10 at checkout. (It is valid on regular-priced items only, doesn't count toward shipping and tax, and cannot be used with their custom stamp service.)
I know for some of you, it feels like Winter just got over - hello, climate change! - but it's always time for holiday card ideas. This sentiment is from Creative Vision Stamps' "Blessings of the Season," a sweet little clear stamp set featuring several sentiments and some snowpeople sporting haute couture! I took the card a more serious direction and just used the largest sentiment. I fussy cut around one of the floral images in the paper, added some Wink of Stella and ribbon to it, and then popped it up over an existing floral image with some foam squares to create a fuller, more dimensional look. Easy peasy!
If you like what I created today, you can shop www.creativevisionstamps.com and use my Design Team discount code to receive 10% off your next order of $20 or more. Enter my code KELLY10 at checkout. (It is valid on regular-priced items only, doesn't count toward shipping and tax, and cannot be used with their custom stamp service.) Only 245 days until Christmas; get started today! 'Tis the season . . . to make some incredible cards for friends and family! If you're hopping along with us today, you just left Nancy's blog. If you have lost your place and want to start over at the beginning of the hop, here's the CardMaker link!
My card, below, uses an acetate base. I have a bajillion of these since I've been in the education biz for quite some time. You can purchase transparencies (acetate sheets) from most office supply stores - or teacher supply stores for that matter - but you'll want to pay attention to the thickness. If your transparency is too thin, it won't stand up with cardstock and embellishments weighing it down. First, I cut my acetate to 5" x 10" and creased it heavily into the top-folded card shape. Next, I cut out a 4 1/2" x 9" from my decorative cardstock and folded it in half. I used double-sided adhesive to attach it inside the acetate. Any personalized message will go inside the top-folded cardstock. I did not add any additional cardstock on the back of the acetate to cover the adhesive, but you can certainly do that if you don't like the look of the adhesive. Next, I created a belly band out of more decorative paper, making the strip long enough to wrap around the card and overlap at least an inch. Your main image, in this case, the sentiment, will cover the area of the overlap. Finally, I used my MISTI tool to stamp the sentiment in red. I stamped the image three times to get a really vivid image. I mounted it on a pieces of white cardstock cut about 1/16" larger than the sentiment panel and adhered the whole piece to the belly band. I thank you so much for stopping by today. Your next step in the hop is Teresa blog! Whatever aspect of the holiday season you observe, I hope it is everything you want it to be this year!
Oh, and one more thing, Cardmaker Magazine is offering an incredible holiday giveaway with over S$2,300 in prizes! CLICK HERE FOR MORE INFORMATION AND THE OPPORTUNITY TO ENTER1 (YES, I'M SHOUTING!) Hello, I'm glad to see you! If you started the hop at the beginning of today's list, you arrived here from Dawn Mercedes Barrett blog. She always does such fantastic work! If you made a wrong turn someplace and need to get back to the hopping order, here is the list: 1. The Project Bin Denise Pavone Storck 2. Angela Bode 3. Barb Deichl 4. Cheryl Butera Walker 5. Dawn Mercedes Barrett 6. Kelly Clark YOU ARE HERE! 7. Nancy Nickel 8. Patricia Chalas 9. Kelly McKown-Santi Today, the spotlight is on a brand new holiday set from The Project Bin, Joyful Song. And there's PRIZES to be had, people! Two lucky winners will receive one of the two prizes made available by The Project Bin - and all you have to do is leave a comment to be entered! My contribution, is a holiday door hanger, While I made a simple version of the hanger, you could also add it to a wreath for the front door. You could even get the kids involved, and they could create angel wing decorations for the tree1 I found a wing pattern on the internet and printed it out twice. Because I wanted the wings to have dimension. I cut out the back section from one of the sheets and the top section from the other. And then I embossed the crap out of both pieces. And it was a glittery embossing powder, so I'm glittered, the table and chair are glittered, the dogs are glittered, and there's still glitter floating around in the air. What I ended up with were two really stiff, glittery sections of wings. Next, in keeping with all glitter, all the time, I pulled out a sheet of silver glitter paper and trimmed it out to be just about 1/8" larger than the wings. (If you give this a try, remember you need to cut a left wing and a right wing, so you don't waste glitter paper like I did!) I mounted all the pieces with mounting tape and set them aside while I worked on the medallion. I stamped the sentiment on some shimmer paper (it doesn't show up in the photos) and cut it out with a fancy die. I also cut out a slightly larger background circle from some of the leftover glitter paper and mounted the sentiment on it with mounting tape. I attached the wings to the back of the sentiment, added a small ring on the back, and threaded some silver twine through it. Lastly, I glued a beautifully glittery blue star at the top of the twine, making sure to leave a loop at the top to make it easy to hang. The Project Bin also has two other holiday sets - Maybe Christmas and Luke 2. I'm playing at CrazyHazelNuts Christmas Challenge, Dragonfly Journeys, Hiding in My Craftroom, Thru the Purple Haze Challenges, and Aud Sentiments Challenge!
Next up is Nancy Nickel at The Nickel Nook. Whoo-hoo! Remember, it's never too early to start those holiday cards, and The Project Bin is a great place to find just the right sentiment!
I know, I know. "Why is Kelly making Christmas cards instead of snow/winter cards this year?" Relax.! The heathen is still in the house. Bottom line? I'm a sucker for cute Christmas paper and now I have a reason for using it!
I've used a sentiment from The Project Bin's "Maybe Christmas" and created a card with an unusual fold, as well a heart that was made by dipped it in super-thick embossing powder and heating it four times to give it dimension and sheen. Does that closure remind anyone else of the report card envelopes we used to get in grade school? I always fussed with the closure, not sure if the figure eight or the straight loop was the way to go! For those of you who know me well, you are probably surprised to see me posting a Christmas card. No, this heathen has not changed her beliefs; she now just gets to design holiday cards for others to send!
This 4.25" x 4.25" card has a simple pop-up inside. There's room to write a short message on the word search panel as well as the green panel and the back of the card. This is the perfect-sized card for those people who only sign their name(s) on their holiday cards...which, in my estimation, is a complete and utter waste of postage. If you're only going to get in touch with people once a year, why don't you share a little of what's been going on with you? Editorial comments are now concluded! |
It's Just Me!Librarian, crafter, pet mom, and thrift store shopper who can fritter a day away like nobody else. Well, except for you maybe. Let's be friends!
SCRAPLIFTING & CARDJACKINGAll content included on Serendipity & Whimsy is COPYRIGHT ©Kelly A. Clark.This artwork is shared for your personal inspiration and enjoyment only and may not be used for publication, submissions, or design contests.
Design Team ExperienceArchives
July 2020
Categories
All
|