 |  |
 |  |
Me? Do digital? Yes!
Well, sort of.
But before I get all crazy with this post, let me say, "Howdy!" and "Thank you for dropping by!" You most likely landed here from Karen's page, which is the start of this hop. If you get turned around at anytime, just head back to her where the master hop list lives!
OK, I've used digital stamps for many years with complete ease. Digital scrapbooking, though; not so much! In fact, I've only "successfully" created one page IN MY ENTIRE LIFE! And I qualify that "successfully," because I don't really know what I'm doing, and I'm sure there are a lot of things I need to complete or fix to really call it a success!
So bear with me as I guide you through the digital scrapbook page odyssey I've come to call "Follow the Pixel-Filled Road."
The four 8" X 8" pages I made are built using Club Scrap's digital kits called "Creative License." I supplemented some of the embellishments on the pages with elements from Club Scrap's "Fur-Ever Friends" digital hybrid kit and the "Dog" digital kit. I also added a few elements I've had since I created that ONE page I made way-back-when.
I am fortunate to have Photoshop CS6 on my work computer. Like driving a Hummer for most people, it is probably more software than I need and/or can handle! My pages do not have anything complicated going on. In fact, the steps I used to make each of them are NEW, LAYERS, and PLACE. (I also merged some layers, but that wasn't hard or even necessary.) You can do this!
I do not have any fancy screen shots, as that, too, is above my pay grade! (I spent so much time undoing to correct mistakes, the screen shots would have most likely represented my boo-boos, so I just left them out. Maybe next time...) So, I'll just break down what I did and let you know if/when I made really stupid errors I can keep you from doing, too!
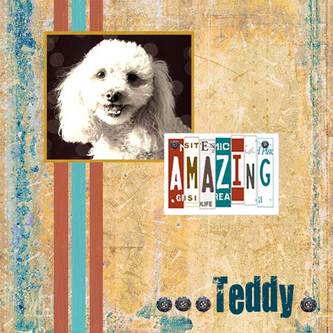
To make the Teddy page, I used one of the backgrounds in the "Creative License" digital kit. I reduced it to fit the 8" x 8" page. Then I layered on the photo and the photo mat. Next, I layered in two of the other backgrounds and reduced them down to narrow strips. Finally, I layered in the "Amazing" graphic, and the steel rivets. The last thing I added was the text layer. I used the "You are Loved" font which came from DaFont. I liked the grungy look of it with the grungy papers.
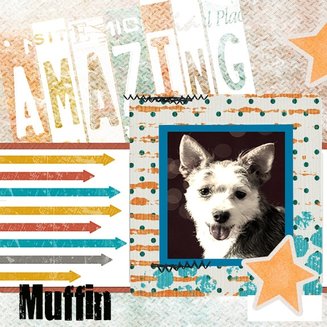
Next is the Muffin page. For this one, I used a template from the collection. All I needed to do was layer in the photo and add any embellishments I wanted. First, I layered in the photo and a photo mat. Next, I layered in the frame, the stitching, and stars from my digital stash. Lastly, I added the text layer using the same font.
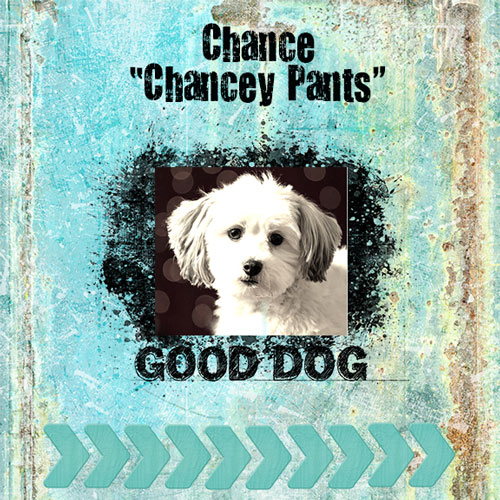
Chance's page was constructed using layering like I did for the Teddy page. I added the messy splotch from one of the kits behind the photo, as well as the "Good Dog" sentiment. To finish up, I layered in arrows from my digital stash.
Miss B's page was also constructed as Teddy's was. I layered in hearts from my digital stash behind the photo. Then, I layered in a different background from the kit and reduced it to become the strip at the bottom. I added the text at the bottom and the top with the same font.
Stuff to know if you want to try this:
1. It's really hard to screw anything up in digital design. Photoshop (or any similar program) lets you undo anything you suddenly realize was a bad move. Also, the program forces you the "place" everything you do. It's like saying "I do!" to the layer, but you can still "annul" the step if you choose.
2. If you get stuck on anything, there's a YouTube video tutorial for everything in the known world. At some point in the process, I closed the layers panel and needed to learn how to get it back - internet to the rescue! There are also tutorials on Club Scrap. I plan to spend some time looking at digital pages I like so next time I sit down to design, I can pull up a couple of tutorials and make myself look like a genius in comparison to these pages!
3. I wanted my photos to blend with the papers in the kit, so I used a free basic photo editor program to make them look like "old photos" which isn't exactly black and white, but still fairly neutral in color.
4. Granted, these are pretty simplistic pages, but once I got on the roll with the whole layer-and-place routine, the process was super-duper fast. I think doing pages this way can take away some of the tactile joy that comes with traditional scrapbooking, kind of like reading a book from an e-reader. The end product is the same, but something might be lost in the process. I, however, am much more likely to actually complete pages digitally, so I'm willing to make the trade-off, and if I need the tactile experience, I'll belly up to the craft table, and whip out a few cards. Choose what works for you.
Whew! That's it for me. Next on the hit parade is Donna, and you can reach her blog by clicking on the graphic below. You can also head back to Karen's page if you've missed a stop or you want to begin anew.
Until next time...
Well, sort of.
But before I get all crazy with this post, let me say, "Howdy!" and "Thank you for dropping by!" You most likely landed here from Karen's page, which is the start of this hop. If you get turned around at anytime, just head back to her where the master hop list lives!
OK, I've used digital stamps for many years with complete ease. Digital scrapbooking, though; not so much! In fact, I've only "successfully" created one page IN MY ENTIRE LIFE! And I qualify that "successfully," because I don't really know what I'm doing, and I'm sure there are a lot of things I need to complete or fix to really call it a success!
So bear with me as I guide you through the digital scrapbook page odyssey I've come to call "Follow the Pixel-Filled Road."
The four 8" X 8" pages I made are built using Club Scrap's digital kits called "Creative License." I supplemented some of the embellishments on the pages with elements from Club Scrap's "Fur-Ever Friends" digital hybrid kit and the "Dog" digital kit. I also added a few elements I've had since I created that ONE page I made way-back-when.
I am fortunate to have Photoshop CS6 on my work computer. Like driving a Hummer for most people, it is probably more software than I need and/or can handle! My pages do not have anything complicated going on. In fact, the steps I used to make each of them are NEW, LAYERS, and PLACE. (I also merged some layers, but that wasn't hard or even necessary.) You can do this!
I do not have any fancy screen shots, as that, too, is above my pay grade! (I spent so much time undoing to correct mistakes, the screen shots would have most likely represented my boo-boos, so I just left them out. Maybe next time...) So, I'll just break down what I did and let you know if/when I made really stupid errors I can keep you from doing, too!
To make the Teddy page, I used one of the backgrounds in the "Creative License" digital kit. I reduced it to fit the 8" x 8" page. Then I layered on the photo and the photo mat. Next, I layered in two of the other backgrounds and reduced them down to narrow strips. Finally, I layered in the "Amazing" graphic, and the steel rivets. The last thing I added was the text layer. I used the "You are Loved" font which came from DaFont. I liked the grungy look of it with the grungy papers.
Next is the Muffin page. For this one, I used a template from the collection. All I needed to do was layer in the photo and add any embellishments I wanted. First, I layered in the photo and a photo mat. Next, I layered in the frame, the stitching, and stars from my digital stash. Lastly, I added the text layer using the same font.
Chance's page was constructed using layering like I did for the Teddy page. I added the messy splotch from one of the kits behind the photo, as well as the "Good Dog" sentiment. To finish up, I layered in arrows from my digital stash.
Miss B's page was also constructed as Teddy's was. I layered in hearts from my digital stash behind the photo. Then, I layered in a different background from the kit and reduced it to become the strip at the bottom. I added the text at the bottom and the top with the same font.
Stuff to know if you want to try this:
1. It's really hard to screw anything up in digital design. Photoshop (or any similar program) lets you undo anything you suddenly realize was a bad move. Also, the program forces you the "place" everything you do. It's like saying "I do!" to the layer, but you can still "annul" the step if you choose.
2. If you get stuck on anything, there's a YouTube video tutorial for everything in the known world. At some point in the process, I closed the layers panel and needed to learn how to get it back - internet to the rescue! There are also tutorials on Club Scrap. I plan to spend some time looking at digital pages I like so next time I sit down to design, I can pull up a couple of tutorials and make myself look like a genius in comparison to these pages!
3. I wanted my photos to blend with the papers in the kit, so I used a free basic photo editor program to make them look like "old photos" which isn't exactly black and white, but still fairly neutral in color.
4. Granted, these are pretty simplistic pages, but once I got on the roll with the whole layer-and-place routine, the process was super-duper fast. I think doing pages this way can take away some of the tactile joy that comes with traditional scrapbooking, kind of like reading a book from an e-reader. The end product is the same, but something might be lost in the process. I, however, am much more likely to actually complete pages digitally, so I'm willing to make the trade-off, and if I need the tactile experience, I'll belly up to the craft table, and whip out a few cards. Choose what works for you.
Whew! That's it for me. Next on the hit parade is Donna, and you can reach her blog by clicking on the graphic below. You can also head back to Karen's page if you've missed a stop or you want to begin anew.
Until next time...


 RSS Feed
