Don't ya just love how the sentiment works for the recipient AND the paper?!
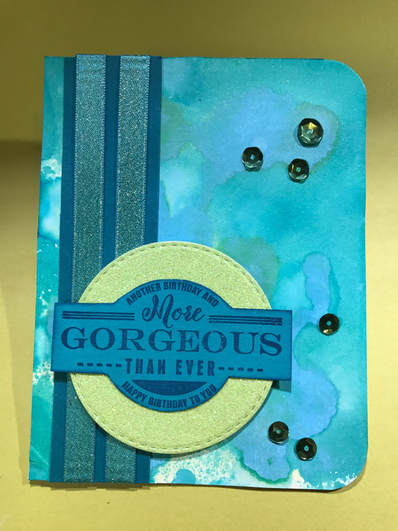
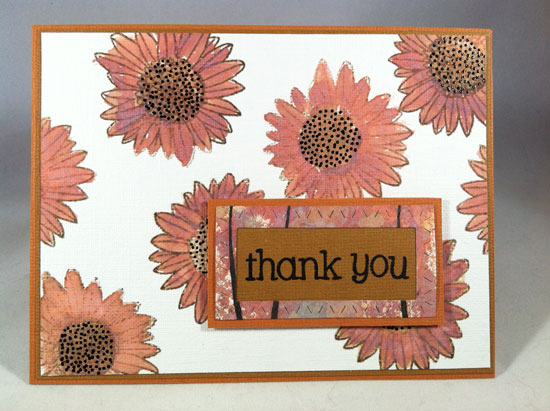
...and the greens and the golds! I made the paper with Distress Oxides and just loved the effects. I added a birthday sentiment from The Project Bin's "Born Yesterday" set and mounted it on a circle of light green glitter paper. I threw some sequins on and called it a day.
Don't ya just love how the sentiment works for the recipient AND the paper?!
0 Comments
How do I mask thee? Let me count the ways... Hey! You must have been at Lisa's awesome blog - it's hard to have to follow her - before this. You are darned near the end of the blog hop, My Friend! Th1s was a hard challenge . . . ain't gonna lie. I'm not very good at coloring hair using Copic markers, doing anything with flower shapes, an/or making CAS (clean and simple) cards. So, the following cards are presented with the best one first. I wouldn't be hurt if you just skipped over the other two and went right for Wendy's blog. Seriously. Ugh. This is the card that came closest to meeting the challenge requirements. I stamped, colored, and sponged the main image, from the "Big Top" set, then used a circle punch to cut circles out of post-it notes. Then I wasted a whole lot of Distress Oxide ink getting to the colors I wanted in the background. All in all, I love it and think I'll send it in to a magazine to see if I can get published. This was my first attempt to make a CAS card for the challenge. I stamped a background for the sentiment using the back of a stamp, then added the sentiment. I added some glossy ink to the word "life" and on the stars to help them stand out more. I flicked ink onto the paper to make it look like confetti. Meh. Second attempt, again using stamps from "Big Top." I finally have the masking thing figured out. Sadly, I stamped the ticket upside down. That would be OK if I had maybe a couple of coins to stamp on there to make it look as someone emptied out their pockets after going to the circus. But . . . no. Well, that's it for me. Hop right on over to Wendy's blog to finish the hardest challenge EVER! Or head back to Club Scrap to check out the goodies in the store! Thanks for dropping by!
You have most likely just hopped from Karen's post to get here. If at any point, you wander astray, her post is where it all begins! The challenge this month was to make beautiful things with this stamp set. I've said it before and I'll say it again, I am not a flower person, so this truly was a challenge for me! This was also my first chance to play with the Distress Oxides that recently came out. So, I'm not sure these cards qualify as beautiful, but they are darned unique and whoever ends up with one of them better appreciate that I like them enough to send them a dang card I made by hand. That is all. I was thinking summer for these flowers, but they kind of got a little closer to Fall with the colors I started with. My process, which was more or less what better qualified stampers have shown in numerous videos, was to smoosh the ink pads onto a piece of acetate or other plastic surface, spray it and the surface of the paper with water and then pick color up from the acetate by laying the paper across the surface and picking it back up. Then, where you have empty spots, you can dip the paper into the ink again until you like the way it looks.
Adding water to the ink as it is on the paper will make the colors morph a little bit. The water "stains" the existing ink. After I had the Distress Oxides inks down the way I wanted them, I added a few patches of dark ink on a piece of bubble wrap to add a different texture to the paper. I did a little free-hand painting on the gatefold card images using the ink left on the acetate after making the background paper. I added in some loops of the orangey fibers from the Boardwalk kit and popped in a sentiment. Which I cut apart to make it smaller for the card. I stamped one of the tall flowery images on the background with black ink, waited for it to dry, then ran it through my Big Shot to create the small window in the card. H mounted it onto a black piece of cardstock slightly smaller than the card base. I stamped the birthday sentiment from the kit onto a piece of cardstock, mounted it onto a scrap piece of coordinating paper, and added the whole schmear into the opening. After it was all said and done, I added some white gel pen to the flowers/weeds. Kind of like that background! FInally, I free-hand painted the daisy looking flowers onto some linen watercolor paper I picked up someplace. Stamping the image on was tough because of the uneven texture, so some flowers look more, uh, flowery, than others. The Distress Oxide inks layer on each other instead of becoming a big smear, I double mated the image and attached it to a card base. I stamped the sentiment on a piece of coordinating cardstock and stuck it behind part of the pop-out from the thank you card. And because I just couldn't leave it alone, I added Sakura glaze ink to the inside of the flowers. Ta-dum! Thanks so much for coming by.. Just click on the arrow below to get to your next stop, Donna's "Hawthorn Hill" blog! |
It's Just Me!Librarian, crafter, pet mom, and thrift store shopper who can fritter a day away like nobody else. Well, except for you maybe. Let's be friends!
SCRAPLIFTING & CARDJACKINGAll content included on Serendipity & Whimsy is COPYRIGHT ©Kelly A. Clark.This artwork is shared for your personal inspiration and enjoyment only and may not be used for publication, submissions, or design contests.
Design Team ExperienceArchives
July 2020
Categories
All
|